How to Create an Emoji Icon Set
This page may contain links from our sponsors. Here’s how we make money.
In today’s tutorial, we’re going to learn how to create a cute little emoji icon pack, using nothing more than a couple of basic geometric shapes and tools found within Adobe Illustrator.
So, assuming you already have the software up and running, let’s jump straight into it!
Tutorial Details: Emoji Icon Pack
- Program: Adobe Illustrator CS6 – CC 2020
- Difficulty: Beginner
- Topics Covered: Compositional Construction, Shape Alignment, Grid Positioning
- Estimated Completion Time: 60 Minutes
Final Image: Emoji Icon Pack

1.Set Up a New Document
As with any new project, we’re going to kick things off by creating a New Document by heading over to File > New (or by using the Control-N keyboard shortcut) which we will adjust as follows:
- Number of Artboards: 6
- Spacing: 32 px
- Columns: 3
- Width: 64 px
- Height: 64 px
- Units: Pixels
And from the Advanced tab:
- Color Mode: RGB
- Raster Effects: Screen (72 ppi)

2. Set Up the Layers
As soon as we’ve finished setting up our project file, we need to take a couple of moments and structure it by opening up the Layers panel and then creating a total of two layers, which we will rename as follows:
- layer 1 > reference grids
- layer 2 > icons
By doing so, we will separate our icons from the reference grids, which will allow us to streamline our workflow.

3. Create the Reference Grids
Once we’ve finished layering our document, we can move on to adding the basic reference grids, which will help protect our icons from being clipped by integrating a small protective padding.
Step 1
Grab the Rectangle Tool (M) and use it to create a 64 x 64 px square, which we will color using #F15A24 and then position to the center of the first Artboard using the Align pane’s Horizontal and Vertical Align Center options.

Step 2
Add the active drawing area using a smaller 56 x 56 px square (#FFFFFF), which will give our icons an all-around 4 px protective padding. Once you’re done, make sure you select and group the two shapes together using the Control-G keyboard shortcut.

Step 3
Fill in the remaining Artboards using five copies (Control-C) of the reference grid that we’ve just finished working on, which we will paste in place using the Shift-Control-V keyboard shortcut. Take your time and once you’re done, make sure you lock the current layer before moving on to the next step.

4. Create the Blank Repeating Head
As soon as we’ve finished setting up our project file, we can position ourselves onto the second layer (that would be the top one), and then zoom in onto the first Artboard, so that we can start working on the repeating blank head.
Step 1
Start by creating a 56 x 56 px circle, which we will color using #ffc024 and then center align to the larger underlying Artboard.

Step 2
Add another 56 x 56 px circle, which this time we will color using #ffda24, and position on top of the previous one, making sure to leave a gap of 8 px in between their bottom anchor points.

Step 3
Finish off the head, by first selecting and grouping the two shapes together using the Control-G keyboard shortcut, and then masking them both afterwards using a copy (Control-C) of the underlying shape, which we will paste in front (Control-F) and then once you’ve selected all three of them simply right click > Make Clipping Mask.

Step 4
Once you’re done creating the repeating head, don’t forget to populate the empty Artboards using five different copies which we will paste in place using the Shift-Control-V keyboard shortcut.

5. Create the Smiling Emoji Icon
As soon as we’ve finished adding the copies of the blank head, we can position ourselves back onto the first Artboard, where we will gradually create the first emoji.
Step 1
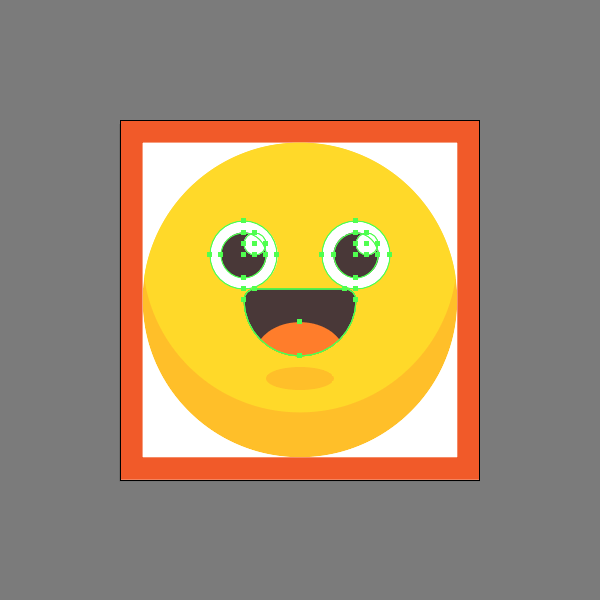
Start by creating the main shape for the chin using a 12 x 4 px ellipse, which we will color using #ffc024 and then horizontally center align to the underlying Artboard, making sure to position it at a distance of 4 px from the head’s darker section.

Step 2
Create the main shape for the mouth using a 20 x 12 px rectangle, which we will color using #473535 and then position above the chin, at a distance of just 2 px.

Step 3
Adjust the shape that we’ve just created by opening up the Transform panel, and then setting the Radius of its top corners to 2 px, and its bottom ones to 10 px from within the Rectangle Properties.

Step 4
Create the main shape for the tongue using a 16 x 12 px ellipse, which we will color using #ff7e27 and then position to the center of the mouth’s bottom anchor point.

Step 5
Add the teeth using a 16 x 4 px rounded rectangle (#ffffff) with a 2 px Corner Radius, which we will position to the center of the mouth’s upper edge. Once you have the shape in place, select both it and the tongue and then group (Control-G) the two together since we’ll be masking them in the upcoming step.

Step 6
Mask the shapes that we’ve just grouped using a copy (Control-C) of the underlying mouth, which we will paste in front (Control-F) and then with all three shapes selected simply right click > Make Clipping Mask. Take your time, and once you’re done, don’t forget to select and group (Control-G) all of the mouth’s composing shapes before moving on.

Step 7
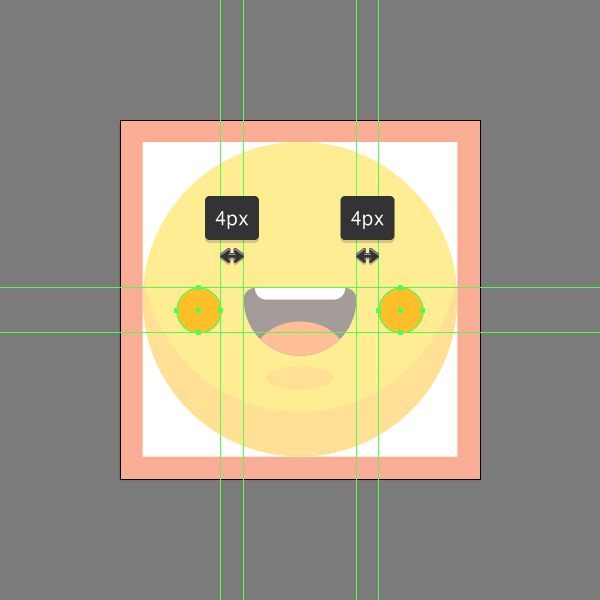
Create the cheeks using two 8 x 8 px circles, which we will color using #ffc024 and then position onto the sides of the mouth, at a distance of just 4 px.
Step 8
Start working on the left eye by creating the sclera using a 12 x 12 px circle, which we will color using #ffffff and then position onto the mouth’s left edge as seen in the reference image.

Step 9
Add the pupil using a smaller 8 x 8 px circle, which we will color using #473535 and then center align to the previously created shape.

Step 10
Create the little highlight using an even smaller 4 x 4 px circle (#ffffff), which we will align to the previous shape’s top and right anchor points.

Step 11
Finish off the eye by adding a 12 x 4 px ellipse to its bottom anchor point, making sure to select and group all of its composing shapes afterwards using the Control-G keyboard shortcut.

Step 12
Add the right eye using a copy (Control-C > Control-F) of the one that we’ve just finished working on, which we will position onto the opposite side of the head.

Step 13
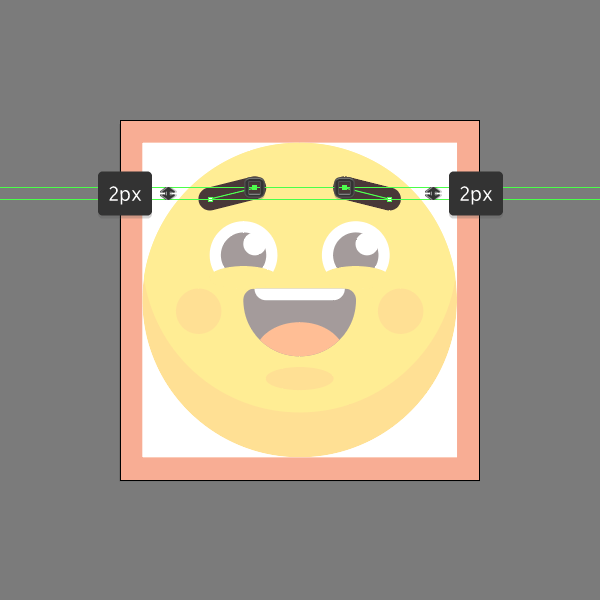
Create the eyebrows using two 8 px wide 4 px thick Stroke lines (#473535) with a Round Cap, which we will position above the eyes as seen in the reference image.

Step 14
Finish off the emoji, by adjusting the shape of the eyebrows, by first selecting their inner facing anchor points using the Direct Selection Tool (A) and then pushing them to the top by a distance of 2 px using the directional arrow keys. Once you’re done, don’t forget to select and group (Control-G) all of the icon’s composing shapes before moving on to the next one.
6. Create the Skeptic Emoji Icon
Assuming you’ve finished working on the first emoji, we can jump onto the next Artboard where we will gradually build our second one.
Step 1
Start by first double clicking on the previous emoji in order to enter Isolation Mode, and then grabbing a copy (Control-C) of its eyes and the eyebrows, which we will then paste (Control-F) onto the current Artboard.

Step 2
Adjust the eyebrows and with them the emoji’s expression itself, by selecting the left one’s outer anchor point using the Direct Selection Tool (A), and then getting it back into its original position by pushing it upwards by a distance of 2 px. Once you’re done, select the right eyebrow and then vertically reflect it by right clicking and then heading over to Transform > Reflect > Vertical.

Step 3
Quickly adjust the eyes, by selecting the bottom overlapping ellipses using the Direct Selection Tool (A), and then positioning them onto the opposite side using the directional arrow keys.

Step 4
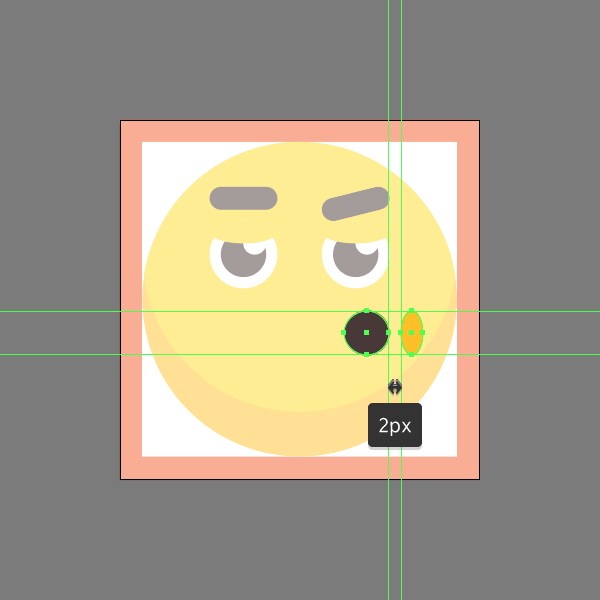
Create the mouth using an 8 x 8 px circle, which we will color using #473535 and then align to the right eye’s outer anchor point, making sure to position it at a distance of 4 px.

Step 5
Finish off the current emoji by adding the small dimple using a 4 x 8 px ellipse, which we will color using #ffc024 and then position onto the mouth’s right side as seen in the reference image. Once you’re done, don’t forget to select and group (Control-G) all of the icon’s composing shapes using the Control-G keyboard shortcut.
7. Create the Amazed Emoji Icon
As soon as we’ve finished working on the second emoji, we can move on to the current row’s last Artboard, where we will gradually assemble our third one.
Step 1
Start by creating the main shape for its left eye using a 20 x 20 px circle, which we will color using #ffffff and then position at a distance of 6 px from the active drawing area’s left edge, and 10 px from its top one.

Step 2
Quickly add the pupil using an 8 x 8 px circle (#473535), followed by the highlight using a smaller 4 x 4 px one (#ffffff), which we will position as seen in the reference image.

Step 3
Give the eye its expression by creating a 20 x 8 px ellipse, which we will color using #ffda24 and then align to the main shape’s bottom anchor point. Once you have the shape in place, make sure you select and group all of the eye’s composing shapes using the Control-G keyboard shortcut, before moving on to the next step.

Step 4
Create the right eye using a copy (Control-C > Control-F) of the one that we’ve just finished working on, which we will position onto the opposite side of the larger head.

Step 5
Start working on the mouth by creating its main shape using an 8 x 16 px rounded rectangle (#473535) with a 4 px Corner Radius, which we will horizontally center align to the larger underlying head, making sure to position it at a distance of 4 px from its darker section.

Step 6
Add the tongue using a 16 x 12 px ellipse, which we will color using #ff7e27 and then center align to the mouth’s bottom anchor point.

Step 7
Mask the shape that we’ve just created using a copy (Control-C) of the underlying shape, which we will paste in front (Control-F) and then with both of them selected simply right click > Make Clipping Mask. Once you’re done, make sure you select both the masked shape and the mouth and group them together using the Control-G keyboard shortcut.

Step 8
Finish off the emoji, by adding the cheeks using two 8 x 8 px circles (#ffc627) which we will position onto the sides of the mouth, at a distance of 4 px. Take your time, and once you’re done, make sure you select and group (Control-G) all of the icon’s composing shapes before moving on to the next one.

8. Create the Grumpy Emoji Icon
Assuming you’ve finished working on the third emoji, we can position ourselves onto the next row of Artboards, where we will quickly assemble the grumpy emoji.
Step 1
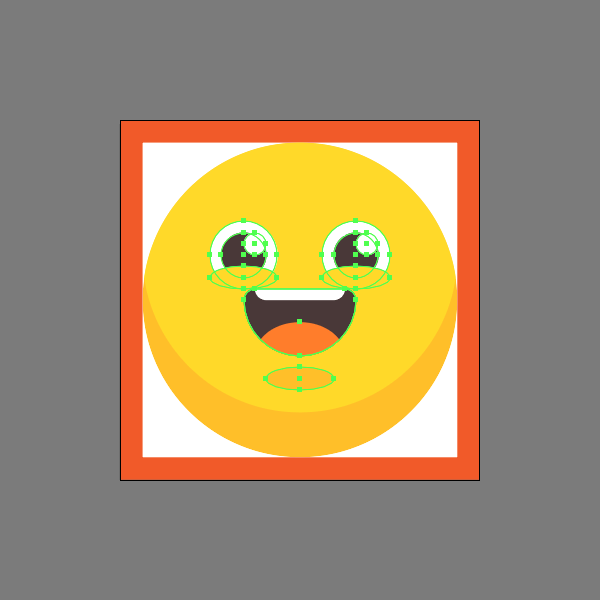
Start working on the little emoji, by first grabbing a copy (Control-C) of the first one’s eyes, mouth and chin, which we will paste (Control-F) onto the current Artboard.
Step 2
Adjust the face features that we’ve just copied, by removing the overlapping eye sections, and then the teeth.
Step 3
Further adjust the look of the eyes, by selecting them both, and then horizontally reflecting them by right clicking and then heading over to Transform > Reflect > Horizontal.

Step 4
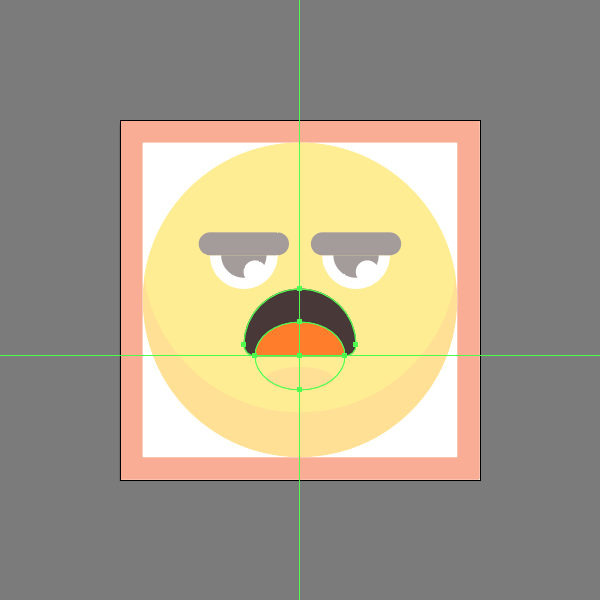
Change the expression of the resulting eyes, by covering their upper halves using two 12 x 6 px rectangles (#ffda24) which we will position as seen in the reference image.

Step 5
Add the straight eyebrows using two 12 px wide 4 px thick Stroke lines (#473535) with a Round Cap, which we will position onto the eyes’ upper half.

Step 6
Quickly adjust the mouth, by first horizontally reflecting it (right click > Transform > Reflect > Horizontal), and then making sure to position the tongue to the center of its bottom edge.
Step 7
Finish off the current emoji, by adding the two forehead lines using a 12 x 2 px rounded rectangle (#ffc024) with a 1 px Corner Radius for the bottom one, followed by a slightly wider 16 x 2 px one (#ffc024) for the top one, making sure to vertically stack them at 2 px from one another and the thicker eyebrows. Take your time, and once you’re done, make sure you select and group all of the icon’s composing shapes using the Control-G keyboard shortcut.

9. Create the Crying Emoji Icon
Position yourself onto the neighbouring Artboard, and then zoom in on its active drawing area so that we can start working on our next emoji.
Step 1
Create the main shape for the mouth using a 12 x 20 px rectangle (#473535), which we will adjust by opening up the Transform panel and then setting the Radius of its top corners to 6 px and its bottom ones to 2 px, making sure to position the resulting shape as seen in the reference image.

Step 2
Add the tongue using a 12 x 16 px ellipse (#ff7e27), which we will position to the center of the mouth’s bottom edge, making sure to mask it afterwards, selecting and then grouping the two together using the Control-G keyboard shortcut.

Step 3
Start working on the eyes, by creating the tear cascades using two 4 x 34 px rectangles (#87e0f4), which we will position onto the sides of the mouth, at a distance of just 4 px, making sure to group (Control-G) and then mask them afterwards using a copy (Control-C > Control-F) of the underlying face (desired shapes selected > right click > Make Clipping Mask).

Step 4
Grab the Pen Tool (P) and then quickly draw the wide shut eyes using two 4 px thick arrow shaped Stroke lines (#473535) with a Round Cap and Join, which we will position onto the tears, as seen in the reference image.

Step 5
Finish off the current emoji, by adding the cheeks using two 8 x 8 px circles (#ffc024), which we will position next to the tears, at a distance of just 2 px from the eye lines. As always, once you’re done, don’t forget to select and group (Control-G) all of the icon’s composing shapes before moving on to the next one.

10. Create the In Love Emoji Icon
We are now down to our sixth and last emoji, so without wasting any more time, let’s jump straight into it!
Step 1
Create the emoji’s eyes, mouth, chin and cheeks using a copy (Control-C) of those from the first one, which we will paste (Control-F) onto the current Artboard.

Step 2
Add the main shapes for the left heart using two 12 x 12 px circles, which we will color using #ff7e27 and then position as seen in the reference image.

Step 3
Adjust the shapes that we’ve just created, by opening up their paths, by first selecting their bottom anchor points using the Direct Selection Tool (A), and then removing them by pressing Delete.

Step 4
Continue adjusting the resulting paths, by first uniting them into a single larger one using the Control-J keyboard shortcut, and then quickly grabbing the Pen Tool (P) and drawing the heart’s lower body following the reference image as your main guide.

Step 5
Since the heart needs to be a little more curvy, we’re going to adjust its side transitions, by converting its side and lower anchor points to smooth using the Convert selected anchor points to smooth tool, and then re positioning its handles’ endpoints until we get the desired result.

Step 6
Finish off the emoji and with it the project itself, by creating a copy (Control-C > Control-F) of the heart that we’ve just finished working on, which we will position onto the opposite side of the head. Take your time, and once you’re done, don’t forget to select and group (Control-G) all of the icon’s composing shapes before finally hitting that save button.

Great Work!
As always, I hope you had fun working on the project, and most importantly managed to learn something new and useful during the process.
That being said, if you have any questions, feel free to post them within the comments section and I’ll get back to you as soon as I can!


